
Thursday, February 21, 2008
I can't see my rooms...
As you know, when you delete the room tags from you floor plan doesn't necessarily mean you deleted the room objects; They are still there. However, often you will find yourself inserting a room object into a space that already has a room. So here is a little trick - enable the visibility for the room reference lines and color fill.

Thursday, February 14, 2008
Happy Valentines - Revit Heart Wall
Happy Valentines Day everyone, I thought it would be a good idea to use the ocassion to remind of the Edit Sketch function within the wall object. While very basic, it's been handy many times.

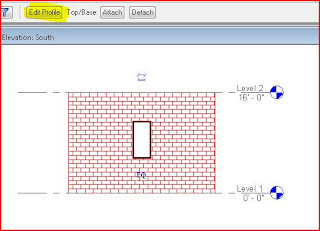


To begin you need to have a wall selected in elevation. Once the wall is selected you will see in the options bar an option to Edit Sketch.

When you click on it, you will go into an overlay mode which is know as sketch more. This overlay mode allow you to change the elevation qualities of the selected wall, this is achieved by either modifying the existing four lines (top, bottom, left or right) or in this car by creating new ones using the Lines command from the Sketch mode tool bar on the left.

Once you are happy with the new elevation shape of your wall, you can click Finish Sketch, or Quit Sketch if you're not (howeve please know the if you Quick Sketch, you can not undo !)

Now you should see that the original wall has taken a new shape, derived from the lines you drew. If any point you wish to change the shape of the all, or even the remove the siluete overide, you can select the wall and look at the option bar where you will find two options. Edit Profile - lets you make changes, or Remove Sketch - revert the profile back to its original state, ortogonal.

Enjoy the day !
Monday, February 11, 2008
Tapered Slab Edges
Hello again ! What I want to share how to take a regular slab in Revit Architecture and taper any or all of its edges. In order to do this we need we will use "The Floor Slab Edge" tool found under "Host Sweep" in the Modeling tool drawer and click on the edges on the floor slab we want to alter. However before we begin we need to configure the "Edge" and this is the tricky part.
First let's build a profile which will give us the shape of the taper. Lets go to and on the dialog box, let's select the appropriate templeter which is Porfile.rtf and click open.

What we have now in front is a drawing area in which we are going to draw our 2D profile. Since this profile will be swept around the edges of the floor slab, we need to draw a section of the taper we want to occur.

Use the Line tool to draw the shape and you can use refereance planes if you wanted to make the profile parametric. By the way come to one of our cusomized training to learn how to build parametric components.

Now just save the profile and load it into your current project or into the project were the floor slab you wish you modify exist or will be created. Now we can go into and redefine the existing slab edge to use the profile we just created.

Once the element properties dialog appear, we need to either rename the current Slab Edge definiton or create a new one by using the Element properties dialog and into Type porperties.

At this point as you can see in the above screen shot, all you need to do is load the profile we made, click OK to exit all the dialogs and beging to click on the edges of your Floor object.
e-mail me or call me here at the office if you have any questions.
Subscribe to:
Posts (Atom)